
Halloween is the perfect time to get creative in the kitchen—and even more so behind the camera! With its eerie atmosphere and spooky aesthetics, Halloween-themed food photography can capture the spirit of the season in fun and imaginative ways. But how do you make your creepy cupcakes and ghastly goodies stand out in your photos? Here’s a step-by-step guide to mastering Halloween food photography and turning your festive treats into art via Zipline Studio featuring Tyson Food Service.
1. Plan Your Theme & Set the Mood
The magic of Halloween-themed food photography starts with the mood you want to create. Do you want your photos to have a playful, colorful vibe with fun characters and bright colors? Or are you going for a darker, more gothic look with moody lighting and mysterious shadows?
Once you decide on the theme, plan your scene accordingly:
– Props: Think cobwebs, mini pumpkins, skulls, candles, and spooky cutlery. These details help tell a story and set the mood.
– Backdrop: Dark fabrics, aged wooden surfaces, or rustic table settings work well for eerie, mysterious vibes. For a lighter look, use colorful napkins or playful Halloween décor like bats and spiders.
2. Use Lighting to Create Drama
Lighting is key in food photography, and Halloween gives you the chance to play with it in exciting ways.
– Moody Lighting: Low, directional light coming from the side or back can create shadows, adding drama to your images. Think of how a spooky film is lit—the deep shadows and highlights add mystery and intrigue.
– Soft Light: For a more whimsical feel, use soft, even light to highlight the fun, playful details of your Halloween treats. Natural light works great, especially for lighter food items like cupcakes or candy.
Remember to experiment with positioning. Lighting from the back or side will give your food depth, while lighting from the front may make your images appear flat.
3. Focus on Color Contrast
Halloween-themed food photography thrives on contrast, both in terms of color and texture. Classic Halloween colors like black, orange, purple, and green pop against each other and help create that unmistakable Halloween vibe. When shooting, think about how colors can play off each other:
– Bright against dark: A bright orange pumpkin pie against a dark black backdrop will stand out and create an eye-catching image.
– Complementary props: Use props that either complement or contrast your food. If your dish is dark, incorporate lighter elements like silverware or light-colored dishes to balance the scene.
4. Play with Depth of Field
Using a shallow depth of field (blurring the background) can really bring the focus to your food and add an element of intrigue. By having just part of the scene in sharp focus, you guide the viewer’s eye to the focal point—the food—while the background adds to the ambiance without stealing the spotlight.
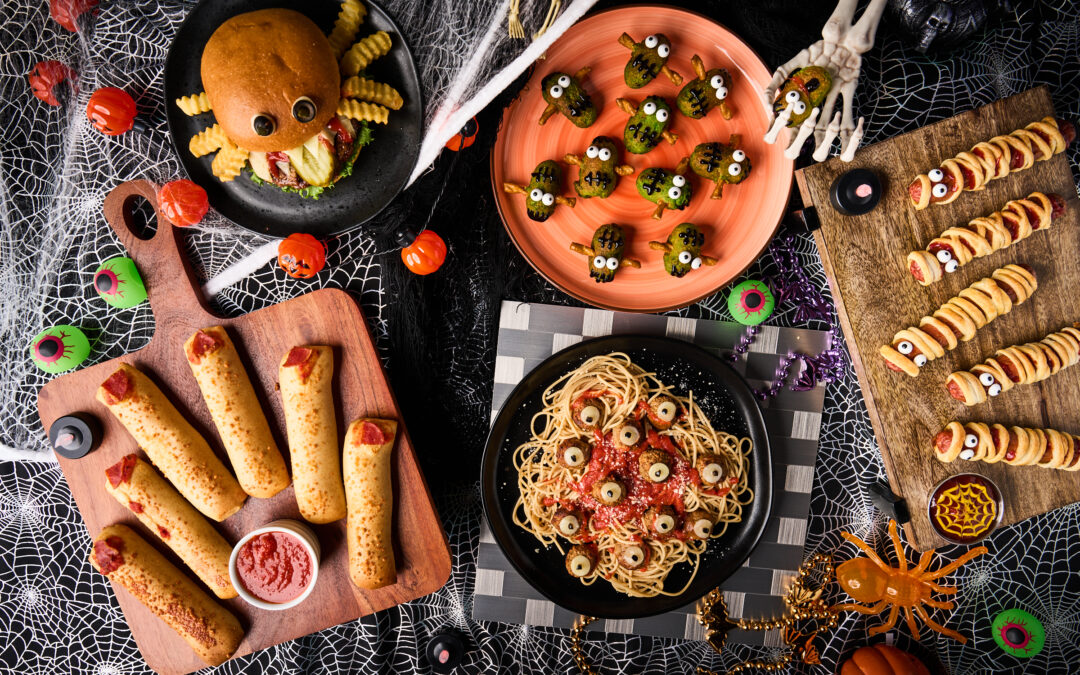
To achieve this, use a wide aperture (low f-stop) setting on your camera or phone. This effect works particularly well for Halloween treats that have intricate details, like decorated cookies, Franken-Weenies, or spooky mummy dogs.
5. Get Creative with Angles
Different angles can dramatically change the feel of your food photos. Don’t be afraid to experiment with various perspectives:
– Overhead shots are great for flat lays and showing off multiple items, like a full Halloween spread with spooky snacks, candy, and decor.
– Close-ups work well to capture textures and details, like the gooey ketchup “blood” oozing out of a spooky burger or the eerie texture of a gelatin dessert.
– Side shots can add depth, especially when photographing taller items like cakes or layered desserts.
6. Don’t Overcrowd the Frame
While it’s tempting to include all your spooky props and food in one shot, less is often more in food photography. Focus on one or two key elements in each shot to avoid overwhelming the viewer. Allow the food to be the star, with the props and background supporting the theme in a subtle way.
7. Edit for Maximum Impact
Once you’ve captured your shots, editing is where you can enhance the Halloween vibes:
– Adjust shadows and highlights to create more contrast and deepen the moody feel.
– Play with saturation to make Halloween colors pop.
– Add a vignette to darken the edges of the image and draw attention to the center.
– Use filters or tools like desaturation or temperature adjustments to create colder, spookier tones if you’re going for a ghostly effect.
8. Highlight Textures and Details
Halloween treats often have rich textures that are fun to highlight in photos—think frosted cupcakes, gooey candy apples, or crispy caramel popcorn. When photographing food with intricate details, focus on capturing the textures that make the dish unique. A close-up of a perfectly iced cookie or the shimmer of candy glaze can be mesmerizing.
9. Tell a Story with Your Setup
The best Halloween-themed food photos go beyond just showing food—they tell a story. For example, a plate of mummy dogs might look even more sinister with a candle-lit backdrop, some scattered candy wrappers, and a creepy hand reaching for them. Your photo should evoke a mood or scene that draws the viewer in.
Final Thoughts
Halloween-themed food photography is the perfect blend of creativity, artistry, and culinary skills. Whether you’re shooting for fun, for your blog, or for a social media feed, remember to experiment, have fun, and let your imagination run wild. Capture the essence of the spooky season and let your photos tell a hauntingly delicious story! 📸🎃
Happy shooting—and happy haunting! 👻